
 URL 복사
 카카오톡 공유하기
Spring MVC
Spring MVC 패턴
MVC란 Model-View-Controller의 약자로, 사용자의 인터베이스 비즈니스로직을 분리하여 개발 하는 것을 말한다
-
Model : 애플리케이션의 정보, 즉 데이터를 말한다 (POJO)
-
View : 뷰는 사용자에게 보여주는 인터페이스, 즉 화면이다
-
Controller : 사용자가 접속한 URL에 따라서, 로직을 수행후 결과 Model을 View에 넘겨준다.
<br/>
<br/>
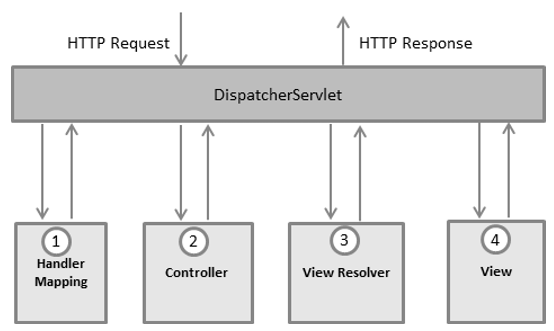
Spring MVC 패턴 흐름
<img alt="" src="https://static.podo-dev.com/blogs/images/2019/07/10/origin/WKEOZZ181224235511.PNG" style="width:554px">
<br/>
-
Dispatcher Servlet은 모든 요청을 받아, 어느 Controller에 해당 요청을 전달할지 결정하는 역할을 한다.
-
요청을 받은 Dispatcher Servlet은 Handler Mapping에게 URL과 매핑되는 Controller의 메소드를 물어보고 결정한다.
-
결정된 Controller는 로직을 수행한 후, View의 이름을 리턴한다. 이과정에서 Model이 생성되어 View에게 같이 전달된다.
-
Distpatcher Servlet은 Controller가 보낸 View 이름을 View Resolver에게 확인받아 물리적 View를 검색한다.
-
결정된 View는 Model 정보와 함께 화면을 표시한 후, Distpatcher Servlet에 보낸다.
-
Dispatcher Servlet이 결과를 최종 출력한다.
<br/>
<br/>
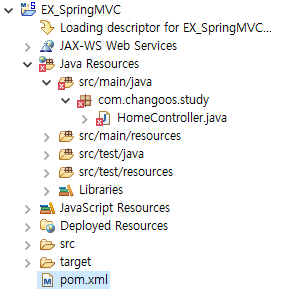
Spring MVC 패턴 구현
<img alt="" src="https://static.podo-dev.com/blogs/images/2019/07/10/origin/XOFXER181224235511.PNG" style="border-style:solid; border-width:1px; width:300px">
- Spring MVC Project를 생성하였다.
<br/>
<br/>
<img alt="" src="https://static.podo-dev.com/blogs/images/2019/07/10/origin/HII7AZ181224235511.PNG" style="border-style:solid; border-width:1px; width:400px">
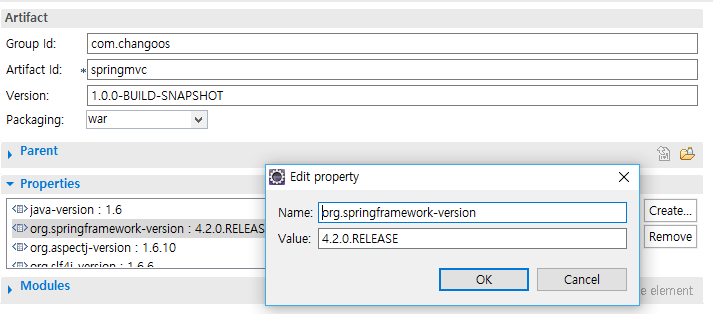
- Pom.xml에 GroupId, Artifact ID를 다시 정의 해주고 Spring 4.2버전으로 바꾸었다.
<br/>
<br/>
	<filter>
	    <filter-name>encodingFilter</filter-name>
		<filter-class>
		        org.springframework.web.filter.CharacterEncodingFilter
		</filter-class>
		<init-param>
		    <param-name>encoding</param-name>
		    <param-value>utf-8</param-value>
		</init-param>
	</filter>
	<filter-mapping>
	    <filter-name>encodingFilter</filter-name>
		<url-pattern>*.do</url-pattern>
	</filter-mapping>
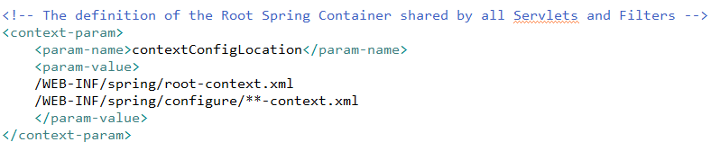
- Web.xml에 UTF-8 인코딩을 위해 다음을 추가하자.
<br/>
<br/>
<img alt="" src="https://static.podo-dev.com/blogs/images/2019/07/10/origin/NAYNEJ181224235512.PNG" style="border-style:solid; border-width:1px; width:560px">
<img alt="" src="https://static.podo-dev.com/blogs/images/2019/07/10/origin/GW5JBV181224235512.PNG" style="border-style:solid; border-width:1px; width:184px">
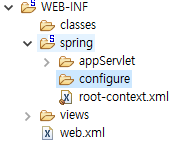
- Web.xml에 스프링 설정파일의 위치를 잡아주자
<br/>
<br/>
<img alt="" src="https://static.podo-dev.com/blogs/images/2019/07/10/origin/GHYJHS181224235512.PNG" style="border-style:solid; border-width:1px; width:294px">
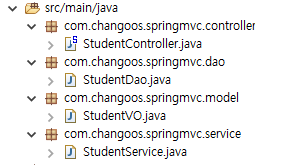
-
우선 MVC구조에 맞게, Controller, Service, Dao, Model로 패키지를 구분해주었다.
-
Student는 임의로 작성
<br/>
<br/>
<img alt="" src="https://static.podo-dev.com/blogs/images/2019/07/10/origin/TUBLWY181224235512.PNG" style="border-style:solid; border-width:1px; width:217px">
<?xml version="1.0" encoding="UTF-8"?>
<!-- servelt-Context.xml -->
<beans:beans xmlns="http://www.springframework.org/schema/mvc"
	xmlns:xsi="http://www.w3.org/2001/XMLSchema-instance"
	xmlns:beans="http://www.springframework.org/schema/beans"
	xmlns:context="http://www.springframework.org/schema/context"
	xsi:schemaLocation="http://www.springframework.org/schema/mvc http://www.springframework.org/schema/mvc/spring-mvc.xsd
		http://www.springframework.org/schema/beans http://www.springframework.org/schema/beans/spring-beans.xsd
		http://www.springframework.org/schema/context http://www.springframework.org/schema/context/spring-context.xsd">

	<!-- DispatcherServlet Context: defines this servlet's request-processing infrastructure -->

	<!-- Enables the Spring MVC @Controller programming model -->
	<annotation-driven />

	<!-- Handles HTTP GET requests for /resources/** by efficiently serving up static resources in the ${webappRoot}/resources directory -->
	<resources mapping="/resources/**" location="/resources/" />

	<!-- Resolves views selected for rendering by @Controllers to .jsp resources in the /WEB-INF/views directory -->
	<beans:bean class="org.springframework.web.servlet.view.InternalResourceViewResolver">
		<beans:property name="prefix" value="/WEB-INF/views/" />
		<beans:property name="suffix" value=".jsp" />
	</beans:bean>

	<beans:bean id="StudentController" 	class="com.changoos.springmvc.controller.StudentController">
		<beans:property name ="studentService" ref="StudentService"></beans:property>
	</beans:bean>
</beans:beans>
<br/>
<?xml version="1.0" encoding="UTF-8"?>
<!-- Service-Context.xml -->
<beans xmlns="http://www.springframework.org/schema/beans"
	xmlns:xsi="http://www.w3.org/2001/XMLSchema-instance"
	xsi:schemaLocation="http://www.springframework.org/schema/beans http://www.springframework.org/schema/beans/spring-beans.xsd">

	<bean id="StudentService" class="com.changoos.springmvc.service.StudentService">
		<property name="studentDao" ref="StudentDao"></property>
	</bean>
</beans>
<br/>
<?xml version="1.0" encoding="UTF-8"?>
<!-- Dao-Context.xml -->
<beans xmlns="http://www.springframework.org/schema/beans"
	xmlns:xsi="http://www.w3.org/2001/XMLSchema-instance"
	xsi:schemaLocation="http://www.springframework.org/schema/beans http://www.springframework.org/schema/beans/spring-beans.xsd">
	<bean id="StudentDao"
		class="com.changoos.springmvc.dao.StudentDao">
	</bean>
</beans>
<br/>
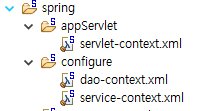
- configure 설정파일 추가, 의존성 주입
<br/>
<br/>
public class StudentController {
	private StudentService studentService;

	public void setStudentService(StudentService studentService) {
		this.studentService = studentService;
	}

	@RequestMapping(value = "/", method = RequestMethod.GET)
	public String home(Model model) {
		StudentVO student = studentService.get("이찬구");
		model.addAttribute("student", student);
		return "home";
	}
}
-
localhost:8080/springMVC/ 라는 URL을 호출해보자
-
Handler Mapping에 의해 Controller를 결정해주고, StudentController의 home() 메소드가 호출 될 것이다.
-
home 메소드는 StudentService 클래스에 로직을 넘기고, Model(POJO) 정보를 받는다.
-
Model 객체를 통해, student 정보를 view단으로 넘겨준다.
-
메소드는 view의 이름을 리턴한다.
<br/>
<br/>
<img alt="" src="https://static.podo-dev.com/blogs/images/2019/07/10/origin/CIVZJU181224235512.PNG" style="border-style:solid; border-width:1px; width:720px">
<img alt="" src="https://static.podo-dev.com/blogs/images/2019/07/10/origin/OHC7SA181224235512.PNG" style="border-style:solid; border-width:1px; width:188px">
-
ViewResolver는 view이름을 검색하여 물리적 view파일을 찾을것이다.
-
servlet-context.xml 설정을 보면 View에대한 prefix, suffix가 설정되어있다.
-
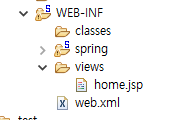
완성된 경로는 /WEB-INF/views/home.jsp가 될 것이다.
<br/>
<br/>
<br/>
<%@ taglib uri="http://java.sun.com/jsp/jstl/core" prefix="c" %>
<html>
<head>
</head>
<body>
	<c:out value="${student.name}"></c:out>
	<c:out value="${student.hakbun}"></c:out>
</body>
</html>
<br/>
- 해당 View단은 Model에서 데이터 정보를 받아 다음과 같이 화면에 표시한다.
<br/>
<br/>
<img alt="" src="https://static.podo-dev.com/blogs/images/2019/07/10/origin/OYZCNW181224235512.PNG" style="border-style:solid; border-width:1px; width:348px">
- 최종화면 출력
<br/>